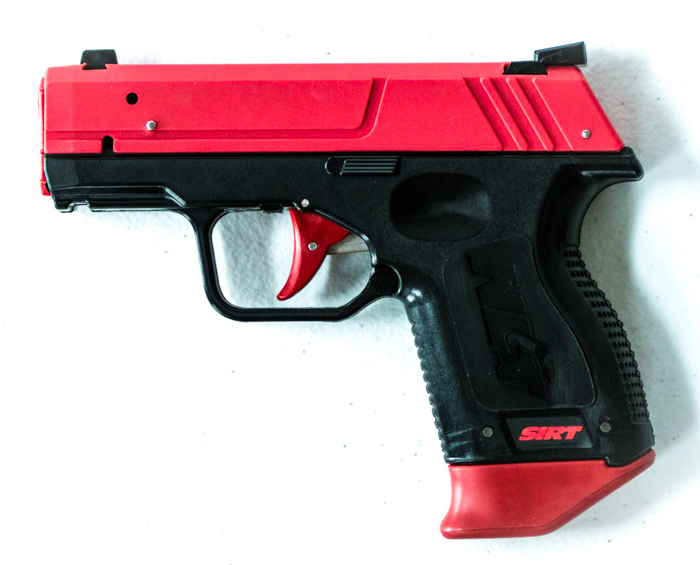
NOTE: You will need a 1.5mm allen wrench (hex wrench) to adjust the SIRT laser, either IR or Red. There is a hole at the top and another on the right side of the SIRT right behind the front sight. Those holes are not the allen screws. The 1.5mm allen screws are down inside of these holes. You have to feel for them.
NOTE: There is an Option in iFightBack to turn off the hit indicator circles on video scenarios. Normally, for IR use, you do not want any indication of where a missed shot landed other than the reaction of the bad guy when fatally hit. That is one of the primary reasons for using IR in the first place; you want to depend on your trigger control and sight picture to place your shots, not follow a laser trail. However, this option does not apply to targets. The idea is that real paper targets will have a hole just like the hit indicator circle so we kept them for targets regardless of what your Options setting is. For adjusting IR lasers, this hit indicator circle will be used as your visible indicator of where the shots are landing since you will not be able to see the actual IR laser hit.
 If
you have a SIRT 110 with a visible laser and want to switch to an IR laser without
having to buy a whole new gun, you can order a replacement laser module from
SIRT for about $80. They do not show these on their web site so you need to
call them at 360-284-4201 to order. Remember that iFightBack requires a minimum
of a 40ms extended pulse delay. A SIRT visible laser will stay on as long as
your finger is on the trigger. The IR laser, on the other hand, does not so
they come with various extended pulse times. SIRT offers 44ms and 64ms extended
pulse delays for their IR lasers. Order the 64ms to be on the safe side.
If
you have a SIRT 110 with a visible laser and want to switch to an IR laser without
having to buy a whole new gun, you can order a replacement laser module from
SIRT for about $80. They do not show these on their web site so you need to
call them at 360-284-4201 to order. Remember that iFightBack requires a minimum
of a 40ms extended pulse delay. A SIRT visible laser will stay on as long as
your finger is on the trigger. The IR laser, on the other hand, does not so
they come with various extended pulse times. SIRT offers 44ms and 64ms extended
pulse delays for their IR lasers. Order the 64ms to be on the safe side.
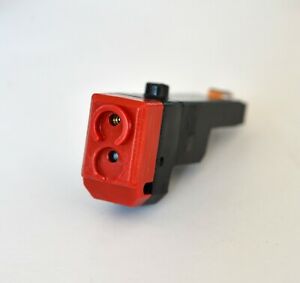
If you want to replace an existing green laser with a red one, they have these as well for only about $45.
 You
will be using Laser Video -> Targets to adjust your SIRT laser.
You
will be using Laser Video -> Targets to adjust your SIRT laser.In iFightBack® go to Laser Video. Select your camera and start it. Use Step 2 to help get your camera in position and aligned properly with the screen. In Step 3 click on Calibrate Camera Angle. And in the Finally tab click on Select Scenario and click on Targets and select "Target BullsEye 7yd". Now click on the Adjust Camera button. Once the camera is adjusted be sure to shoot the [START] box on the screen to begin.
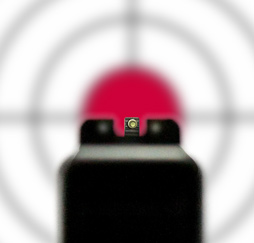
First check how the laser is shooting before attempting any adjustments. Aim your SIRT carefully at the bullseye target and squeeze the trigger. A few shots like this will let you know if you need to adjust the shots higher or lower or to the left or right. To clear the shots and start with a fresh target, click on the Stop button in the lower left area of the Camera Setup window and then click the same button which is now the Start button. Your previous orange shot indicator circles will be removed and you will have a clean target to continue with.
NOTE: The two hex screws are pushing or pulling the rear of the laser so, if you tighten (turn clockwise) the windage screw on the side, you are pushing the rear of the laser to the left causing the front of the laser to go right. Unscrewing (counter clockwise) the windage screw will cause the front of the laser to move left. The same with the elevation screw at the top of the pistol. Screwing the elevation screw down clockwise will push the rear of the laser down causing the front of the laser to go up and visa versa. Be sure to make your adjustments is small steps and be sure not to go so far as to completely unscrew any of the adjustment screws or so tight as to harm the delicate threads.
So pick either elevation or windage to start with and make your preliminary half turn or un-turn and fire a shot. Still off, do another half or quarter turn and fire another shot. Rinse and Repeat. Once you get one adjustment lined up, switch the allen wrench to the other adjusting screw and do the same with the other. Once the iFightBack shot indicator circles are showing on the target in the same spot you were aiming, you are set to go. Remember, if too many shots are on the screen for you to see where the new shots are landing, click the Stop and then Start button and that will clear the target.
As always, if you are having problems, contact us or go to the Help menu pad at the top left of the screen (not the Help box on the screen) and go to Tech Support -> Send email to tech support...
"Si vis pacem, para bellum". (If you want peace, prepare for war.)
SelfDefenseSoftware.com ©
last updated 11/28/2020
website help file