By: Ed Hardin (Certified NRA firearms instructor) for iFightBack (Self-Defense Software for home or classroom)
You own a gun for self defense, you carry concealed and you are pretty good at hitting a paper target at the range. So you are prepared to protect yourself and your family, right? Maybe not so much when you are almost paralyzed with fear or panic and your brain can no longer think straight.
The Chemistry of Fear
Humans have a mental and physical response to mortal danger, which is typically the only time you will be drawing (or trying to draw) your weapon from concealment. This is called the “fight or flight reflex” and it is kick-started with a huge dump of adrenaline into your blood stream. The effects this adrenaline dump can have on you includes loss of fine motor skills (e.g. trigger finger), tunnel vision (you only see what is directly in front of you), hearing exclusion (you no longer hear what is going on around you), trembling, loss of bodily functions, etc. These effects can be lessened with training but not entirely eliminated. You need to train in order to overcome these involuntary reflexes. Practice will transition the act of drawing your weapon during a crisis into a reflex that does not need to rely solely on deliberate, conscious thought for each step. A reflex in other words. Without training you will be less effective in handling your weapon and more likely to be a danger to yourself and others.
While we are on the subject of “fight or flight”, don’t forget that flight –OK, call it rapid tactical redeployment if you want – can sometimes be a good choice.
The Remedy
OK, so what training am I talking about here? At the range you are practicing basic shooting skills such as stance, grip, sight alignment, sight picture, trigger control, breathing, and, hopefully, follow through (recovering the sight alignment after the recoil). But that is not going to help you at all if you can’t get your gun out of your purse or holster or you shoot yourself in the foot or someone else while trying to get your gun out because of the adrenaline induced panic. When you carry concealed, every holster, purse, shirt, pair of pants, or dress, will change the dynamics of drawing your weapon. You need to practice with each possible combination so that, if evil ever does step out in front of you, your hand will already be reflexively moving to draw your weapon without you having to consciously think through every step.
The Problem
The problem is that almost all gun ranges will refuse to allow you practice drawing a loaded gun from a purse or holster. And for good reason. According to the NRA “It is a probably-statistically-provable fact that drawing a loaded firearm from a concealed holster is the second most dangerous thing most folks do with their CCW handgun. And I say “second” because the only more dangerous thing is putting it into the holster in the first place.”
(*) https://www.nrafamily.org/articles/2017/4/19/how-to-practice-drawing-a-pistol-from-concealment/
The Solution
So how do you practice this vital skill? The term used is “Dry Fire Practice”. Dry firing is practicing with an unloaded weapon. Because “firing” a weapon with nothing in the chamber may be harmful to some firearms, it is usually recommended to use snap caps or Laser Training Cartridges to protect the firing pin.
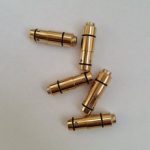
The added and extremely useful advantage of the Laser Cartridges is that they flash a laser dot on your target with each “shot” so that you can see exactly where a bullet would have hit had the gun been loaded.
More to it than Fire
Dry “Fire” practice should be more than just practicing “firing” your weapon. As mentioned earlier, in a real life threatening situation you first have to draw your gun from concealment and that can be dangerous and complicated. In the middle of a mugging is not the time to try and figure out why your gun is snagging on your sweatshirt or where your gun is in your purse.
Practice will reveal any potential problems. You want to find those problems and solve them before you ever have to rely on these skills for self defense.
Dangers of a Panicked Draw
When danger threatens, that “fight or flight” adrenaline rush that we talked about is screaming at your subconscious “SHOOT! SHOOT! SHOOT!” You need to practice over and over again to keep your finger off of the trigger and keep the gun pointed in a safe direction until ready to fire. If these basic rules are not drilled into your subconscious muscle memory you will possibly find yourself swinging your gun about wildly and your finger racing to the trigger and squeezing before you even know what you are doing. You do not want to be shooting yourself, loved ones, or innocent bystanders while trying to protect yourself and/or others.
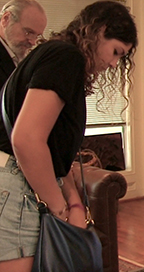
Remember also, that when a purse is in front of you or switched to your opposite “weak” side (away from your strong hand) instead of at your “strong” side, your gun starts off pointing to the side or behind you and not at your attacker. If you reach into your purse at that time and pull the trigger in panic, anyone standing around you would be in mortal danger from you not the attacker. The same holds true of drawing your weapon when the threat is behind or to the side of you. If you do not keep the gun facing in a safe direction as you turn to face the threat, your loaded weapon might be “sweeping” past innocent bystanders and if that subconscious “SHOOT! SHOOT! SHOOT!” forces your finger to find the trigger during that “sweep”, innocent bystanders or loved ones could be shot.
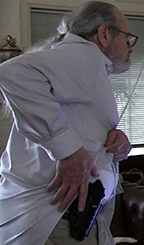
A “strong side” holster (on the side of your strong hand) starts off with the muzzle of the gun pointing down in a safe direction. All you have to do is grip/pull/rotate…and your gun is now facing the threat without having “swept” anyone else. A”cross draw” holster, however, may be pointed down as well but it is more difficult to keep it pointed down as you bring it to bear on a threat in front of you. Some shoulder holsters start with the gun pointed behind you and getting it out of that dangerous position and facing in a safe direction while bringing it to bear on a threat in front of you is even harder. The same holds true for a “Flashbang” holster. In other words, you want to practice not just drawing your weapon in a smooth and rapid manner, you want to practice drawing your weapon in a SAFE, smooth, and rapid manner.
This is what dry fire is meant for since you can’t be practicing this at the range with a loaded weapon. With dry fire you can practice this at your home or office, at any time, with your own gun.
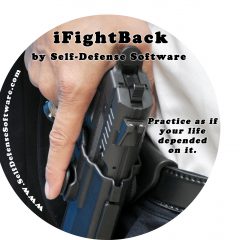
Enhance Dry Fire Practice with modern dry fire software
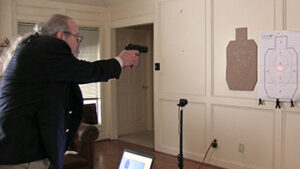
Software such as iFightBack from SelfDefenseSoftware.com takes dry fire practice (using laser training cartridges or a SIRT type laser training pistol) to the next level.

For one thing, it is amazing the difference between internally deciding for yourself when to draw and having an outside source, such as a programmed beep, deciding for you when it is time to draw. That little bit of surprise when the timer goes off helps build reflexes and that is what you want. Calmly telling yourself to draw while practicing does not develop reflexes. Reacting to a beep as the “danger signal” does…Or drawing against a bad guy as shown here in the iFightBack Draw Drill And he is moving while drawing and will shot back. 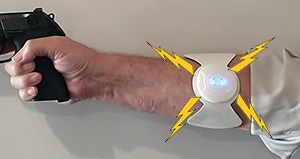 Optionally, the iFightBack ShockPad will really let you know when you’ve been hit.
Click here for a YouTube demo video of one form of iFightBack dry fire practice.
Having the program repeat the drill rapidly over and over also helps. If you screw up, you don’t have the luxury of shaking it off, calming down, and trying it again. With the iFightBack software set to repeat mode, and setting the time between repetitions to only a second or two, if you screw up, you need to immediately jump back into action because the software will not wait. Just like a bad guy will not wait for you to get comfortable.
With iFightBack you also get audio feedback giving you your shot time and shot placement. Shot time will let you know if you if you are getting faster. Shot placement (Head, Center Mass, On Target) will let you know if your accuracy is improving. Your shots will also be shown on the monitor.
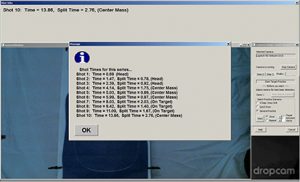 A report is generated that will show these statistics for each shot. If you have a double action gun, like the Beretta PX4 Storm that I have, or a SIRT type laser training pistol, you can try “General Target Practice” and the report will also give you your split-times between shots. With a single action gun you can practice the “Tap and Rack” jamb/misfire drill between shots in order to have the gun racked for the next shot.
There is also the “5-Step Draw Drill”. You can set the speed between steps and the program will call it out as you practice. “Grip – Pull – Rotate – Join – Extend and Fire” and finishes off with “Scan and Assess” after the shot to remind you to get out of tunnel vision mode and check your surroundings.You can set the speed slow to start with and increase it as your movements become more natural and smooth. Remember that “Slow is smooth and smooth is fast”.
Most videos you will find on the 5-Step Draw Drill will demonstrate drawing from an Outside the Waistband (OWB) holster but the same steps apply to any form of concealment. With a purse, for instance, the “Grip” is when you put your hand into your purse to grip the weapon. If your purse is currently on your opposite or weak side the “Grip” may entail also swinging your purse around to your strong side while gripping in order to be in position when you “Pull” the gun out of the purse and “Rotate” it to be pointing at the threat. This would be the same as practicing with your back to the threat. You want to hold off on the “Rotate” until you are facing the threat. So you “Grip” and can be “Pull”ing while you pivot around to face the threat but you do not “Rotate” your weapon until you are finally facing the threat. This is to make sure that you are not “sweeping” innocent bystanders in case that screaming adrenaline shouting “SHOOT! SHOOT! SHOOT!” gets the better of you and your trigger finger starts acting on it’s own.
In Conclusion
Practice as if your life depended on it!
“Si vis pacem, para bellum”. (If you want peace, prepare for war.)